General |
||
Parties |
||
World Environment |
||
Welcome to Quest, the 2nd Age and the world of Kharne. This is the full set of rules. In here are contained the basic rules that covered enough aspects of the game to see your through your first twenty turns but also included are the more advanced features such as controlling spells, making the most out of combat and adventuring through dungeons.
WANT ANOTHER PARTY?
If you are enjoying Quest, you might like to start another party. Each player is allowed to have five parties in a single game. Fill in the form that is on our web site. If you have friends who would like to join Quest, they can use this form too.
STANDING ORDERS
From TURN TWO ONWARDS, you can specify five orders which you wish to become standing orders. These will be processed every turn until either changed or cancelled. They are always processed last, after your normal 15 orders, making a total of 20 altogether. Standing orders must be written in order slots 1 to 5 of your Turncard. To indicate that you wish an order to be a standing order you should double up the first letter.
For example: If you wanted to set standing order 1 to be P 0 and standing order 3 to be I 99 you would write:
Order no 1 PP 0
Order no 2 U 3 101 3
Order no 3 II 99
REMOVING A CHARACTER
You can drop a character from your group. For this to be successful you must write the character name clearly in the order. As a check, the computer will match your spelling of the name with that on the character. If it is, he will disappear along with anything he was carrying. Once this has been done, he can not be recruited again.
XPEL CHARACTER
X (character) (name)
For example: x 3 Ravenhall would throw Ravenhall out of your group.
SPLITTING YOUR PARTY
There may come a time when you want some of your characters to go off an do their own thing. This can be achieved by splitting the party into two. This will require up to three QUIT PARTY orders.
QUIT PARTY
Q (character) (character) (character)
The chosen characters, at the end of your turn, will leave your party and form a completely separate new party. Both the new party and your original party must both have at least six members when they are formed, so your original party must have at least twelve members. The new party will be completely independent. You will send in separate turn cards for each, and each will be charged a turn fee. It is not possible to rejoin the two parties into a single party at a later stage.
For example:
Q 6 7 8
Q 10 12 13
Q 14 0 0
will form a new party consisting of characters 6,7,8,10,12,13 and 14. with the remaining characters staying in the original party
XCEPT RECRUIT
X (recruit) (name)
For example: X 23 Nordheim will accept recruit number 23.You can make the character female at the time of recruitment by using XF instead of X.For example: XF 23 Elanor will accept recruit number 23.
CHARACTER NAMES
You will have already named your character when you recruit them but if you wish to change their names, this can done using the following order.
RENAME CHARACTER
RC (character) (new name)
For example: RC 3 Owyn Orcslayer would give a new name to character 3.
CHARACTER SEX
Al characters when they arrive at your party are classed as male unless you use the XF order. You can if you wish change them to female. The sex of the character has no affect on the success or otherwise of an action.
SEX CHANGE
SX (character/99)
For example: SX 5 will change the sex of character number 5.
SWAP CHARACTERS
SC (character) (character) You can change your party's marching formation using this order. For example: SC 6 2 will have character 6 move to the second position in your party. If a character was already in slot 2, they will swap places with character 6
Next....
INDIVIDUAL ITEMS
It could happen that a character gets to carry two of one type of item. Rather than list them as two swords, the unique item numbers (10,000 plus numbers) will be displayed rather than their general item type. This is so you can indicate to the computer the exact item you require. This is not relevant at this stage of the game but is important later when a character may have two magic swords of different abilities.
This may seem complicated, but it allows each item in Quest to be unique. Every item or monster group has its own set of statistics that can change as the game progresses.
GOLD
Gold is the standard currency of Kharne. You can share out your gold between your characters using the NEW MONEY order. To give an equal amount to each character you would use 99 or to share it out to minimise party loads use 0. Using a character number would result in all gold being given to that character.
NEW MONEY DISTRIBUTION
N (character/95-99/0)
For example: N 99 will share your gold amongst all characters.
If you wished to move an amount of gold from one character to another, the order to use would be the GIVE MONEY order. This order also allows you to give your money away to others. To do this, they must be in the same sector as you.
GIVE MONEY
G (character/99) (target) (amount)
For example: G 12 1 200 would have character 12 give 200 gold to character 1
TRANSFERRING AND SELLING ITEMS
You can transfer items from one character to another or from a character to another player or monster.
You can also sell unwanted equipment and treasure items to shops. If the shop accepts the item, you will be given an amount of gold but if not, they will hand it back. As a general rule, shops buy the same sort of things they sell.
HAND ITEM
H (character/95-99) (target) (item)
For example: H 3 4 150 tells character 3 to give character 4 item 150 (a suit of cloth armour).
H 2 45 151 tells character 2 to sell to shop 45 item 151
ROBBERIES
An alternative way of acquiring gold and items is to arrive at the shop when it is closed! Your thief, with another character as look out, will attempt to break in. Shops selling expensive items tend to have the best defences but even taverns and general stores will install better locks if broken into regularly. Robberies can attract the attention of the town guard and if caught, parties have been known to be thrown out of town.
WAIT AND ROB
W (shop)
For example: W 31 instructs your thief to break into shop 31 and take any money and/or items they find there.
STEAL
S (target)
A thief from your party will attempt to steal money and items from another party, monster or NPC. Unsuccessful stealing may result in an unwanted attack by the monster or party concerned! This is made even worse as the rest of the party may be some distance from the thief when he is caught.For example: S 2487 sends your thief to rob monster group 2487
BUYING ITEMS
One of the first things you will need to do is purchase some weapons and armour. Looking at your first turn report, you will see that you have started the game at a town. The items and services that the shops sell are listed underneath the maps, along with the price in gold. To purchase an item or a shop service, you must use the BUY order.
If an individual character tries to buy an item and does not have enough gold, the rest of the party will lend him enough so the purchase can still go ahead. However, if all the party tries to buy an item (code 99) or one character type, (options 95, 96, 97 and 98), then only the characters that can afford the item will purchase it. Between these two options and by placing your gold with the correct characters, you can quickly equip a party.
If in a city, and you try to buy an item from a shop in a different suburb, your party will move there automatically. To buy an item when you don't know a shop that sells it, use a shop number of zero. Your characters will search for a shop selling it, moving to other suburbs as necessary.
BUY ITEM
B (character/95-99) (shop/0) (item)
For example: B 1 34 102 will tell character 1 to purchase from shop 34 item 102.
B 99 34 152 will tell all your characters to buy item 152.
An army marches on its stomach and so do adventurers. At any time you are outside a town you must carry supplies or your party will begin to starve. Each character will eat one ration per turn.
While in town, it is possible to buy overnight accommodation in a private room but as this can be expensive, towns do not strongly object to parties sleeping on the streets after a night in a tavern's common room. This is fortunate as a new party often has more important ways to spend their limited gold. Taverns do tend to get rowdy and fights can break out. Prices for inn accommodation and travel to other towns are quoted per character.
Each class also has a number of professions. These are characters that started out life training under their more general heading but found they had a natural ability in one particular field or were somehow brought up in a specific manner. However, due to the dedication to their chosen specialisation or as a consequence of their social station destiny set them on a different path. While this has meant that certain avenues of learning have been open to them, other aspects of their class often suffer. Hence an archer could be exceptional with a bow but if he got caught in a close combat situation, his abilities would be below that of a similarly skilled fighter who has a more rounded range of abilities.
The reason for only having four character classes and many professions is that it allows you to use a single order for all the characters of a certain class. This makes changing tactics and trade easier and faster.
As there are certain restrictions on many of the rarer professions such as cannot be resurrected or can only cast certain spells and miracles not to mention certain specific attitudes for the first twenty turns only the common professions of Warrior, Wizard, Cleric and Rogue can be recruited. When other professions become available to recruit, an info-token will be attached to the end of the turn giving a description of important information appertaining to the profession.
While the four basic professions are common, others such as the knight are very rare. The chance of one of these being available for recruitment is almost legendary. It is therefore best not to spend relentless turns attempting to gain a specific profession but choose from whatever comes your way. Just because you want them it does not follow that they want you!
Priest is the generic term for somebody that is able to channel the powers of the gods through themselves in order to perform miracles. Priests are the servants of the gods and their services are rewarded with the ability to perform miracles.
Clerics are the most common priests. Clerics worship and acknowledge the entire pantheon of gods. Even though the cleric acknowledges the entire pantheon, he or she can favour a specific god in return for miracles. The nature of these miracles will be determined by the god, or gods, that the priest serves. As the priest's skill increases, he will be granted the use of more powerful miracles. As certain gods are aligned to war while others are aligned to peace, a priest is inclined to follow the teachings of the god to which they are most closely attuned. The actions of a priest in combat will be determined by his alignment. Followers of the Gods Garthrana and Sundonak would be found fighting long after a priest of Novala or Phyloqure has fled the battle. All priests have to spend some of their time learning to protect their faith and as such have learnt how to act effectively while wearing armour. Some priests such as the Paladin are the holy warriors of the faith. They strive for tests of valour and wish only for a glorious death before joining the gods of war in heaven. From an early age they have sacrificed learning the teaching to learn warfare. As such they rate equal to fighters with the ability to perform miracles. On the down side, many find their fanaticism towards conflict more trouble than it is worth.
Thief is the generic term for somebody that shows no aptitude towards fighting, does not believe strongly in the majesty of the gods and has no gift for mystical forces. The character does however possess some qualities that frowned upon by most upright citizens.
The most common profession of thief is the Rogue. No surprises here. The rogue is a catburglar, pickpocket, and locksmith all rolled into one. Good awareness is the vital attribute here. This also tends to make them good with missile weapons. In combat they will fight if necessary but prefer to use bolts or arrows to strike from a distance. Heavy armour hampers their agility quite severly. Anything bulkier than leather causes severe set-backs. The darker side to the thief is the assassin. Most will not accept their company along with other thieves due to guilt by association or some of the
6. MOLWANH, Goddess of the Fields - nature
A nature goddess but far from benevolent. She resents the order which civilisation brings to the wilderness and takes pleasure in killing crops, sending evil spirits, and making foul weather. Peasants and farmers pray to her constantly in an attempt to appease her.
7. NOVALA, Lady of Fortune - luck
Novala is the queen of trickery, wilfulness and deceit, worshipped by thieves, charlatans and lovers. She often acts on a whim, sometimes to aid, sometimes to hinder. Her followers are natural suspects whenever a robbery or swindle has occurred.
8. PHYLOQURE, Master of Scrolls - knowledge
A god of knowledge and wisdom. He believes that knowledge will always overcome ignorance in the end and that violence is folly of the worst kind. Scholars have found that study and research come easiest to Phyloqure worshipers.
THE GAME OF QUEST
As a new player in Quest, you control a party of brave but inexperienced characters exploring the fantasy land of Kharne. In this world, magic is common and the standard weapon is the sword or bow. All manner of hostile creatures and strange races inhabit the wilderness, with monsters from your worse nightmares located in the deepest dungeons or high in mountain retreats.
The following pages will explain how to control your party and the wide range of options available to you
CHAT LIST
Some of the 'monsters' controlled by the computer are characters or people that travel from town to town or can be found in shops. You can attack them if you wish but if you approach them in a calm, reasonable manner they will often be happy to talk to you. Some will have special information that could be very valuable.
Each party can have up to twenty words on a 'Chat List'. Whenever you meet a character your Chat List is compared with what they know and if any words match, they will tell you something about that subject.
You may add four words to your chat list each turn. A 'word' can consist of up to twenty letters including spaces but not punctuation. Just write the words you wish to add in the space provided at the bottom of your Turncard. If this brings the total on your list to more than twenty words, the oldest one will be deleted. To remove a specific word, write the number of the word in your Chat list. E.g. to remove the sixth word, you would write 6.
In general, the only words that should be used are names of one kind or another. Recommended words to begin with are the names of gods, towns, dungeons, and monster classes. To start you off, a few names have already been added to your chat list.
Shopkeepers are also friendly and often know something about the surrounding countryside. As they are busy, to get them to chat you need to issue the TALK order.
TALK TO CHARACTERS
T (shop)
For example: T 22 has you talk with the owner of shop 22 and any customers.
SELECT SPEED
S (speed)
Speed can be 1, 2 or 3. You can change this by doing another Select Speed order while in a dungeon. Each room you enter normally costs two movement points so a party with speed one can explore thirteen dungeon rooms per turn, ten at speed two, and just seven at speed three. The advantage of moving slow is that your party is more likely to spot traps and ambushes, and will lose less energy.
For example: S 2 selects a medium speed of ten rooms per turn.
TRACK
T (target)
This is the same as the Wilderness order of the same name. Your party will attempt to follow the specified target.
For example: T 830 tells your party to look for tracks made by a type 830 monster.
WAIT AND AMBUSH
W (target)
Your party will prepare an ambush against the party or monster type specified. This is the same as the Wilderness order of the same name.
INVESTIGATE
I (target)
When used in a dungeon this order has an extra use. If you write a room number as the target your party will move to that room (as though an L order had been issued), and will then explore the room with an 'I 0' order, briefly examining everything discovered there. You must know where the room is located for this order to work. The results will be shown on your printout as two separate orders.
LOCATE ROOM
L (direction/room)
Your party will explore the dungeon, moving in the specified movement direction or to a particular room. To move to a room, you must know where it is already.
For example: L 1 would tell your party to explore in a northerly direction.
L 23 will move your party back to room 23.
MOVE OUT OF DUNGEON
M (direction code)
A party in a room with stairs leading to the surface can use this order to leave a dungeon and then travel in the direction indicated by the direction code. The direction code can consist of up to seven directions.
For example: M 233 will move you out of the dungeon then north-east, east, and east again.
Next....
DUNGEON MOVEMENT
| Dungeon movement is a slow cautious process. Your party is moving through a strange unfamiliar environment in poor lighting with danger on all sides.
Moving one dungeon room at a time could make for a very slow game so your party will move in a general direction, exploring several rooms at once. Each room entered costs two movement points. Hint: Make sure you have a good source of light before venturing below ground. Although movement in dungeons is possible without torches or lanterns, it is slow, dangerous and unrewarding. |
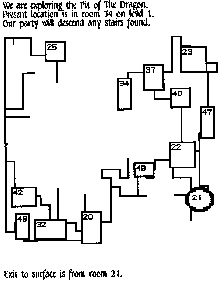 |
DUNGEON ORDERS
DEPTH CONTROL
D (direction)
Use this order to indicate whether you wish to move up or down any stairs found within a dungeon. The direction parameter is 0 to remain on the same level, 1 to move up, and 2 to move deeper. You will continue to do this until you either issue another Depth order, or leave the dungeon.
For example: D 2 would move your party down any stairs found to lower dungeon levels.
Next....
Move
M (direction numbers)
For example: M 557 will move your party south two sectors and then west one.
LOCATE TOWN
L (town number)
For example: L 43 tells your party to move towards town number 43.
WAIT AND AMBUSH
W (target)
Your party will prepare an ambush against the party or monster type indicated. If you meet the target during your turn you will start combat immediately. This order remains in effect until your next turn begins. e.g. at the end of your turn your party will lie in wait and attack the target if it passes through your current location. Should this occur, you will be told the results of the combat on your next turn.
For example: W 3222 tells your party to ambush monster group number 3222
WILDERNESS MOVEMENT
In the wilderness, there are many different types of terrain, each of which costs a number of movement points to enter. As you travel, the cost of entering each sector is deducted from your total available movement points. Once you have insufficient movement points left to enter any more sectors, you can not move any further.
Moving cautiously in the wilderness makes you more likely to find hidden features and enemies will find it harder to take you by surprise. When moving fast, heavily loaded characters can get tired and you are unlikely to discover anything hidden.
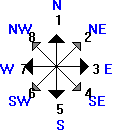
Using the MOVE order, you indicate the direction you wish to travel by a series of numbers (1 to 8). Each number represents a compass direction. By putting several of these direction numbers together you get a path for your party to travel. You can if you wish move further than the area you can see but you will of course be doing this blind.
Issuing the MOVE order while in town will make you immediately leave town and start you off on your travels.Seven movement digits are the maximum allowed in one MOVE order.
If you are in the wilderness and moving to a town, rather than working out the movement code, you can use the LOCATE order. When issued in the wilderness, this will move you as far as possible towards the town you specified. Even if you don't know where the town is, one of your characters may.
|
|
|
|
|
|
3 Road |
4 Field |
4 Open |
4 Village |
3 Town |
3 City |
|
|
|
|
|
|
6 Hills |
7 Mountain |
7 Jungle |
5 Forest |
6 Heavy Forest |
Sea |
|
|
|
|
|
|
5 Barren |
5 Rough |
5 Desert |
7 Swamp |
5 Marsh |
Unseen |
TOWN MOVEMENT
Within a settlement, a party moves from shop to shop, conducting business along the way. No movement points are used doing this. Moving cautiously in towns will help you explore the city in more detail, possibly finding hidden shops but can leave you exposed to pickpockets.
Certain shops sell stagecoach or ship travel to other cities and towns. If you buy this service, it will take your whole party immediately to the new town and any orders following this will be processed there.
Villages and towns have just one area but cities are much larger and have from two to five different areas or suburbs, each of which has its own list of shops. As you move from shop to shop you will automatically move suburb as necessary. However, as you only receive the list of shops for the suburb in which you end your turn, to get a list of shops from a different area, you will need to use the LOCATE order.
Locate Suburb or Shop
L (suburb or shop)
For example: L 3 will move you to suburb number 3.
MOVEMENT POINTS
How far you can travel depends on how many movement points your party has available. If you choose a movement speed of cautious you will normally have 15 movement points, at normal 21 points and at fast 26 points.
Certain things can reduce or increase movement points; for example injuries can slow you down while horses speed you up. You will be told on your turn report how many movement points you have available for your next turn
MOVEMENT
In Quest there are three different types of locations, these being towns, wilderness and dungeons. Each is treated separately with the same order sometimes having different affects depending on the environment. Dungeon exploration has been left for the advanced rulebook.
In any of the three environments, your party can choose to move either fast, normally or cautiously. This is set using the SPEED order and is initially set as normal (code 2) for all locations. You would use code 1 to move quickly, 2 for normal and 3 for cautiously.
A separate speed can be selected for travel in the three different environments. Your party will remember the speed set for each and return to that speed whenever they re-enter the environment. To change speed simply issue another SPEED order while in the right environment.
Speed
S (1=Fast/2=Normal/3=Cautious)
For example: S 1 selects rapid movement for your party in their current environment.
MIRACLES
The spells used by priests are often referred to as miracles. Unlike ordinary spells, no special incantation, movements or powders are required. The priest simply calls upon his god for aid and the rest follows automatically.
A priest's skill represents his favour with the gods. Casting miracles will drain this and can take several turns to regain, just like magical power. Miracles are cast using the same order and in the same format as spells.
A priest's skill at using a particular god's miracles is adjusted up or down by the value shown to the right of the god's name on the party alignment chart. To use a miracle of a particular god, the priest's skill, plus or minus the bonus with that god, must be equal or higher than the points total of the miracle (shown top right of the table).
For example, a priest with a skill of 25 and a Garthrana bonus of 8 makes a total of 33, high enough to cast both the 20 and 30 point powers. However, he would need 7 more skill before he could cast the 40-point miracle.
If you have more than one priest, the miracles for the most skilled priest will be shown. For the priests of lesser ability you should check the Party Spells and Powers section. Also, as the bonuses depends upon your current alignment, if this changes during the turn, miracles that you could cast may no longer be available
ALIGNMENT
|
|

It is important to note that the characters in your control are not slaves to your every whim. They do have ideas of their own and this is indicated by the alignment of the party. If you order actions which are strongly opposed to your party's alignment it is possible that your characters will not co-operate.Alignment is especially important to any priests in your party. Priests are the servants of the gods. They are trained to spread knowledge of the gods and are gifted with special powers to help them in their work. The extent of these powers is largely dependent on their dedication and experience but the nature of the powers they receive depends on their alignment, (see miracles further on). It is quite possible with prayer to become dedicated to one particular God and so be far over to one side of the chart. If you do this and then decide to worship another god, at first you will not be accepted and your alignment will drift from your first god back towards neutral. Once you have become neutral, regular prayer will move you in the direction you wish to go. Certain priest professionss pray only to a single god or a few gods. Should you wish for one of these to join your party, you may find that they restrict future actions of the party. These are generally detailed in the infor-token corresponding to the priest profession at the time of recruitment.
PRAY
P (0/god)
For example: P 5 instructs your party to pray to god Ythcal - the Lord of Death).
THE GODS OF KHARNE
Each of the gods grant different powers and as a priest's alignment approaches that of a god, his ability to use the powers favoured by that god will increase. At the same time his use of the powers from the other gods will decline.
1. BALDOR, Lord of Healing - good
Baldor is a kind God and his priest must always be prepared to provide aid to the weak and the sick. Followers of Baldor are greatly respected by common folk and because of their alignment are often called upon as judges in non-religious disputes.
2. GARTHRANA, The Avenger - vengeance
Garthrana is a goddess of vengeance against evil. Although of good alignment she is war-like and prone to great rage especially against the followers of the evil gods. Her followers must campaign constantly against the evil creatures of the wilderness.
3. SUNDONAK, Warrior Lord - war
The god of war is worshipped by soldiers throughout Kharne. Courage and honour are highly valued while cowardice and treachery will earn his eternal contempt. His followers believe that there is no greater honour than to die in battle.
4. FLEYSHUR, The Destroyer - death
A god of devastation and violence. Fleyshur delights in conflict and battle. While he does not object to slaughter, he prefers a more even battle, where both sides take damage.
5. YTHCAL, Lord of Death - evil
Less violent than Fleyshur but evil to the core. He likes pain and death. Ythcal is probably the most feared of the gods, and his followers are usually shunned by all other priests. His followers are encouraged to injure and kill whenever they get a chance.
Next.....
LEARNING NEW SPELLS
A mage can practice mixing powders together to try to learn a new spell. Basically, he picks a single powder or mixes two or three different powders together and then sees if he can cast it. As he does not know what the spell will do, he uses a target of zero. If the spell works, he will then be able to cast it, plus his skill may increase as he has learnt something new.
It is best to practice learning spells that have just one powder at first, then move on to those with two powders. Knowing the powders that are used in a particular spell does not guarantee success as some spells may be above the skill of the mage. Careful reading will indicate if it was a wasted experiment or if the powder combination may work in the future.
Spell powders always have item numbers of 301 to 309 and a particular spell never uses the same powder twice, however a different order of mixing the powders could be successful, e.g. spell 71 is different to 17.
CAST TEST SPELL
C (character) (powder(s)) (0)
For example: C 2 346 0 tells character 2 to experiment using spell powders 303, 304 and 306.
AUTO SPELL CONDITIONS
It is often the case that you will not want to use the same spells for all occasions. Ranking and de-ranking them them is too slow. Auto spell conditions allows you mages and priests to add certain conditions to each spell that will determine whether it is cast during the combat. Every spell for the character or characters is given a condition at the same time so it is imperative to make certain that the number order is correct.
Each spell can be given a value from 0 to 9.
The order sets all six spells at once, so remember to use 0's for spells that aren't ranked.
AS Character or 97 or 98 or 99 6 Digits
Each of the digits indicate if the spell will be used in a combat.
0) No condition - Always cast (the default setting)
1) Don't use when engaging weaker monster groups
2) Don't use when engaging smaller monster groups
3) Don't use when engaging player parties
4) Don't use when engaging weaker or smaller monster groups
5) Don't use when engaging parties or weaker monster groups
6) Don't use when engaging parties or smaller monster groups
7) Don't use when engaging parties or weaker or smaller monster groups
8) Don't use when engaging monster groups
9) Don't cast!
e.g. AS 12 038380 - Your character 12 will always use the first and sixth ranked spells, the 2nd and 4th will not be used when engaging player parties and the 3rd and 5th will not be used when engaging monster groups.
Smaller monster groups are those with fewer members than the party.
Weaker monster groups are those where the total health of the monsters is less than 1/5 that of the party
CASTING SPELLS
The casting of a spell usually involves an incantation, (complicated chant) waving of the arms and most importantly the mixing of rare herbs and powders. These are called spell powders. The spell number indicates the powders used in a spell, each digit representing the last digit of the spell powder.
For example, spell 98 would require powders 309 and 308, one of each would be used when the spell is cast
A Mage's skill represents the magical power or energy available to a mage. Casting a spell causes a lot of mental stress and uses some of this power up. Some power will be regained at the end of a turn and during rest. To cast a spell, the mage must have enough power points available.
Cast Spell
C (character) (spell) (target)
For example: C 11 23 14 will have character 11 cast spell number 23 on character 14
MAGIC
Characters that start the game as mages will know how to cast only a few simple spells; those listed in the Spells and Powers table of your turn report. An information token will be provided for each spell which describes what the spell does and what you can cast it on.
ARENAS
Arenas are an exciting place to learn much about combat. It gives you the chance to pit your party against another player's party in a duel. The difference between arena combat and normal combat is that the effects only apply for the duration of the combat. Once the fight is over, the two sides are magically restored to how they were prior to the fight.
To have a fight in an arena, you need to issue the VISIT ARENA order, challenging another player's party. This order can only be issued in a city or town. The player controlling the other party will be notified of your party's desire for a duel. If they accept the challenge, next time they are in a city or town, they should issue their own VISIT ARENA order, this time against your party. The duel will then occur immediately, irrespective of where the first party is currently located.
If your challenge is not accepted, you can issue another order against a different party. This will cancel your original challenge so you should wait a couple of turns before doing this. Only one VISIT ARENA order is allowed per turn. A target 0 will cancel the prospective duel and select no new target, this is a special case and can be used anywhere.
VISIT ARENA
VA (target party/0)
For example: VA 1230 will request a duel with party 1230.
NO ATTACK STATUS
To allow you to quickly get into Quest and provide you with some protection from older, more powerful parties, your own party is on NO ATTACK status. This means that other players can not attack you but you in turn can not attack them. Attacks on or by monsters are unaffected. When you feel you are ready, you can switch this option off but once you do, you will never be able to switch it back on again.
Parties which are using the NO ATTACK option have an asterisk (*) listed after their party name when shown on the terrain map or city list.
NO ATTACK STATUS
NA
For example: NA will switch off the No Attack status
INJURIES, POISON, DISEASE AND DEATH
When a character is injured, their health will drop. If it ever reaches zero they are considered dead. The value in ( ) shows the characters maximum health while the other figure is his current health. Injuries heal naturally but they can be speeded up by priest or mage spells or from buying temple services.
It is possible for a character to become diseased, poisoned or cursed perhaps from a spell or creature. These are not classed as 'normal' injures so healing spells have no affect. The effects will disappear by themselves in time or more specialist help can be found.
If one of your characters dies, the rest of your party will, if possible, salvage the body for possible resurrection later. The longer a character remains dead, the more the body decays continually losing statistics and knowledge. Eventually, a body will get in such a poor state that resurrection is no longer possible.
Baldor temples will resurrect characters from parties on turn number 20 or less for free. Above this, a fee is demanded as tribute. If you decide you don't wish to resurrect a character, you can get rid of the body by using the XPEL order
COMBAT EXPERIENCE
All characters taking part in combat will gain experience points. These, along with some gold, can be exchanged for skill increases at training shops found in most towns. Additionally, all characters have a chance of an improvement in weapon skills, even if on the losing side.
It is also possible to gain a very basic skill with a weapon by self-training. This is done by using the same character as both the learner and trainer. To gain a faster and higher level of experience but without going to a professional trainer, other members of your party who have some understanding of the weapon, can give basic instruction. This costs 100 experience points.
Weapons practice can only be done on a single character basis. You can not use options 95-99 to have many members of your party practice together. This would be far too easy!
USE WEAPON PRACTICE
U (character) (weapon) (trainer)
For example: U 5 110 3 tells character 3 to train character 5 in the use of maces.
WITHDRAWING FROM COMBAT
Once a fight has started, it will continue until one side has either been eliminated or retreats from the battle. In the case of player owned parties, these will never fight until all characters are wiped out although several deaths are quite possible. What a monster will do depends on what type it is, some are cowardly and will run away as soon as they see you, others will fight to the death.
You can set the amount of losses you are willing to take using the FLEE order. This is a very rough guide as to how much damage your guys will take before trying to retreat from a battle. It is used for both individual characters and for the party as a whole. This is because in a battle which is not going well, it is likely that one or two characters will become badly injured and these will retreat before the rest of the party in an effort to stay alive. The remaining characters will continue to fight until either they are injured, the party as a whole retreats, or of course, you win.
Different character classes and race types affect retreat, as do some spells. Plus, once a character starts withdrawing, he can still be targeted until he has got away completely. However, as he withdraws, he will parry with any attackers so there is less chance of further injuries. Dwarves, fighters and priest of the War Gods are prepared to take the most damage before retreating. Even so, they will not lay down their life if they can help it. As flee factor is a percentage of the maximum sustainable damage before the character flees, even with a FF of 100, some characters, notably halfblood thieves will run from combat after suffering around half their health. It is good to keep this in mind when setting your Flee Factor as a high value does not mean do or die for ALL your characters.
If you try to pick a fight with a monster or another player that is far tougher than you, your characters will refuse to take part in a suicidal attack. If you elect to use multiple engage orders, you do stand the risk or 'going for it' possibly with horrible results. Keep this in mind when using multiple engage orders against dragons as they tend to eat people.
FLEE
F (1-100)
For example: F 20 orders your party to retreat once they have taken losses of twenty percent or more
COMBAT OPTIONS
As the computer deals with combat, all the actions that your characters will attempt during combat must be specified beforehand. At this time though, the only one of concern is whether your characters will prefer to use melee weapons, option 0, or missile weapons, option 1, at the start of combat.
Missile weapons can obviously be used long before the enemy is close enough for sword fighting, but are generally slower. Further, they cannot be used once an enemy has engaged the character in melee, thus valuable time will be lost drawing a melee weapon.
Choosing melee for a character will mean that the character will never use a missile weapon instead, charging at the enemy. Your character's preferred choice of weapon will be underlined on the party statistics table.
Note, at the start of combat, mages and priests will try to cast any suitable spells rather than use weapons, see later.
COMBAT PREFERENCE
CP (character/95-99) (0/1)
For example: CP 96 1 will set all your party's thieves to use missile weapons.
TRAVELLING FORMATION
The order your characters are listed on your turn report is the order they are considered to be travelling. Hence, character one is at the front of your party, followed by character two, then character three and so on. When in combat, the characters at the front of a party are the easiest to get to so they tend to be targeted by the enemy first. Hence, it is a good idea to have the characters you would prefer to be most protected towards the rear of your group.
Swap Character Positions
SC (character) (character)
For example: SC 6 2 will have character 6 move to the second position in your party. If a character was already in slot 2, he would swap places with character 6.
INITIATIVE AND SURPRISE
If one side or the other reacts before the other, they will gain a few vital seconds. This of course gives them a slight edge. One way to help avoid getting surprised is to keep a special watch out for a possible enemy using the KEEP EYES OPEN order.
KEEP EYES OPEN
K (target)
For example: K 819 tells your party to be alert for any monster types 819.
ATTITUDE
A (target/0/180) (attitude)
Attitude will affect how your party reacts when it encounters other parties, NPC's or monsters. You may have an overall attitude, four general attitudes and up to eight specific attitudes. Attitude can be 1, 2, 3, or 0 where 1 is friendly, 2 is neutral and 3 is hostile. 0 cancels it.
Your overall attitude is set by specifying 0 as the target. The four general attitudes cover four main fields in the game and are shown below with the number you should use to select each:
- All parties = 170
- All monster = 180
- All NPC's = 190
- All alliances = 200
Specific attitudes are chosen by using the party number, NPC monster class, monster group number or alliance number as the target.
Where two or more attitudes clash, the most specific is used, e.g. if you were friendly to all monsters but had a specific attitude of hostile to all Orcs, you would fight any Orcs you met.
For example: A 180 3 would set an attitude of hostile towards all monsters.
A 818 1 would set an attitude of friendly towards monster class 818. When you encounter a monster you will be told both its class and its group numbers. This will enable you to set attitudes to a specific monster class for future encounters.
INITIATING COMBAT
There are two common ways to start a fight. You can issue an ENGAGE order that will cause your party to attack the monsters or other player's party as soon as you come into contact with them. This order will remain in place until either your party meets the target, or you issue a new ENGAGE order or the turn ends.
If your party is in the same location as your target when you issue the order, your party will attack immediately. Multiple ENGAGE orders can be used in an attempt to finish off any monsters that fled, though this will not work against other players' parties. Alternatively, issue a new ENGAGE order for another target and move to fight this.
Within settlements, laws prohibit the use of weapons and spells. While this does not prevent fights, it means that generally a brawl at the local tavern is the only alternative. These skirmishes can be fought against other players' parties using the ENGAGE order. Typically, they are relatively harmless and can even be a lot of fun.
ENGAGE
E (target)
For example: E 2123 tells your party to attack on sight monster group 2123.
The second common way a fight will start is due to your party's attitude. You can set how you would like your party to behave towards other monsters and players. The choices are friendly which is option 1, neutral which is option 2 or hostile which is option 3. This overall attitude uses 0 as the target.
You can set up to a further eight attitudes towards specific targets. These can be a monster class (i.e. all orcs) or a monster group (i.e. orc group 3451) or another player's party. In addition to your eight specific attitudes you can set your reaction towards all monsters by using code 180. To cancel an independent attitude, use 0 as the attitude code.
Where two or more attitudes clash, the most specific attitude is used
Next....
Rashly Kallen the Swift fired a black feathered arrow, the arrow skittered past the skinny Young Barbarian's scarred body. Gand Gutripper 8 wasted the gangling Young Barbarian. He staggered backwards, then fell dying, clutching the mighty gash in his throat. A quick thrust and enemy blood was shed. A cheer of victory went up as the first of the enemy was slain. Kallen the Swift fired, just missing the skinny Young barbarian's scarred body. Scrounger clumsily winged a stone, within a finger's breadth of the skinny Young Barbarian's body. Kallen the Swift executed the skinny Young Barbarian. He died, punctured through both of his lungs. Blood welled from the mouth of the corpse. 'Death to all,' was chanted as a second one was killed. Looking for trouble, Gand Gutripper 9 the fighter watched the bald Barbarian. He advanced towards the enemy. Curses were bellowed as the fight began in earnest 10 . Scrounger let the stone fly, striking the bald Barbarian. He was hit in the arm. Raising his long sword, the bald Barbarian 11 swung, striking Ung the Pious, slicing through flesh. Scrounger let the stone fly, striking the bald Barbarian in the arm. Thorin the Valiant 12 impetuously bashed, passing harmlessly past the bald Barbarian. More warily now the heroes sought openings 10 . Horagnir the Slow massacred the bald Barbarian by slicing his head down the centre like a ripe water melon. The enemy was dead. We got 107 gold from the lair of the dead Barbarians. We earned 40 experience points. |
8 - Finally Gand arrives, he is lightly armoured and uses a knife. This makes him swift to enter combat, but also the use of a dagger means that he will fight fast. 9 - Having killed the Barbarian Gand then sets out to attack another opponent. 10 - These comments show roughly equivalent time frames since the start of the melee combat. Using these, a rough guide to the speed of characters can be built up over time. 11 - The Barbarians have finally made it to combat range and start attacking. Ung is the unfortunate target. The more characters present, the greater the chance that a character towards the front of the group will be targeted. 12 - Thorin and finally Horagnir arrive. These characters have heavier armour than Gand. This slows them down a little. When they arrive however, they quickly deal with whatever is present. In battles against more opponents, their ability to attack faster becomes vital. |
| When we got nearer to them, we examined them with a keen eye. There were three Barbarians. They did not appear to be injured.
Kallen the Swift 1 the elf espied the skinny Young Barbarian. He quickly set off on light feet in pursuit. Holding his long bow, Kallen the Swift 2 fired the black feathered arrow, winging the skinny Young Barbarian deeply in the guts. Ung the Pious 3 tried to cast miracle Healing, but nobody needed healing. Ung the Pious 4 didn't cast Terror as the enemy looked too weak. Scrounger 5 let the stone fly, striking the gangling Young Barbarian, forcing a scream of agony. Kallen the Swift 6 rashly loosed an arrow, the arrow skittered past the skinny Young Barbarian. Kallen the Swift fired, the shaft whistled past the skinny Young Barbarian's body. Scrounger's sling released its stone, it striking the gangling Young Barbarian in the throat 7 . The gangling Young Barbarian retreated. |
1 - Kallen sets off towards the enemy. While it only mentions Kallen, the comment applies to the entire party.
2 - Kallen has reached longbow range and has fired his first arrow. 3 - Ung has finished preparing his first miracle, healing, but at this time nobody needs healing. As there is no way of telling if nobody will need healing at the start of the prayer, healing miracles will always be attempted if set to always cast. 4 - After a spell has been completed, the next one in the list is checked to see if it will be cast. Spells will be checked in order until one is suitable for casting, or no spells are found, in which case the character will proceed to either missile or melee combat. 5 - Scrounger has reached sling range and has fired his first stone. Slings have a shorter range than bows. Looking through the combat it can be seen that even though Kallen is a fighter, Scounger is using a sling which is slightly faster although much less damaging. 6 - Not all misses are reported, but enough are to give an indication of the events as they unfurl. It can be seen that considerable time goes by during which the archers hammer into the enemy. 7 - The description of the wound indicates how close the target is to death. In this instance it is clear that the gangling Young Barbarian is very close to being killed. |
COMBAT EXAMPLE
This is a full battle taken from the party Goldbrickers. At the time of this combat they were ten turns old. They comprise of only six characters. Once they get some gold together, they will recruit a mage. At this point in their development, they will not go too far from town and will carefully evaluate any monster group before the consider fighting it. They are set up to fight small groups of monsters with light armour. They rely on speed and dealing damage before the monsters can effectively retaliate. The fighters have weapon proficiencies in the forties so they are often missing.
Thorin the Valiant - a dwarven fighter dressed in chain mail and wielding a warhammer. Thorin is the hard case of the party. He generally is last to enter battle, but then proceeds to waste everything left. As a dwarf he is very adept at wielding the warhammer and with his chain mail will take big monsters without too much fear.
Horagnir the Slow - a human warrior dressed in leather armour and wielding a short sword. Horagnir, like Thorin trundles into battle usually around the same time as Thorin. He uses a short sword which is not as damaging as Thorin's warhammer but is swift. Combined with his light armour, he is effective against orcs and other weaker monsters. If he was going to take on bigger monsters, he would likely swap the short sword for a long sword.
Gand Gutripper - a halfblood fighter with no armour and only a shield and helmet for protection. He is fast, swiftly out-pacing both Thorin and Horagnir. He uses a dagger in combat. Daggers are the favoured weapons of halfbloods, becoming a blur in his hands.
Kallen the Swift - an elf fighter, like Gand, he has no armour and only a helmet for protection. He wields a long bow. He swiftly reaches long bow range and then launches many arrows at the enemy before they reach the party. Should he be forced to enter melee, he uses a short sword to make the most of his lack of encumbrance.
Ung the Pious - a human priest. His role is ensure that all characters are healed before any fighting begins in earnest. After this he will cast flame if necessary, but failing that, he will then enter combat with a spear. The spear is good for this character as it has a reasonable range and delivers a fair amount of damage. He prefers melee to missile as, after casting his miracles, it is likely that the enemy will be upon him, thus he does not want to waste valuable time changing weapons.
Scrounger - a halfblood thief with no armour and a sling. The thief is a complete coward and stays at the back of the party where it is unlikely that he will be targeted. This allows him to hurls stones swiftly for the entirety of most combats while the fighters take the damage. Slings are the favoured weapons of halfbloods and in their hands, stones fall like hail amongst the enemy, even if they do not do that much damage
Next....
COMBAT
As you would expect in a fantasy environment, combat can be frequent and deadly. You can order your party to attack other players' parties as well as computer-controlled monsters and characters. By the same token though, monsters may well attack your party without provocation or warning.
While combat is dangerous, your characters will generally look out for themselves. This self-preservation prevents your characters from staying till the bitter end when victory is nowhere in sight. Further, your party may even avoid a fight altogether if it offers nothing but death. Often weaker, common monsters venture near settlements such as towns and cities. These can prove an excellent way of learning more about combat not to mention being a lucrative source of gold and treasure. Obviously buying weapons and armour will greatly enhance your characters' survival rate although it is best to avoid heavy, encumbering armour for those that are not in too much danger or those that wish to make the most out of their natural speed.
At the start of the combat, the archers will split away from the party in order to get a clear shot of the enemy. Those casting spells and miracles will start to mix ingredients and chant prayers. Those electing to fight in melee will set off towards the enemy, targeting an individual from amongst the enemy ranks. The fight will quickly become a skirmish as archers sprint to new positions in order to get their shot. Due to the nature of spell casting and the use of miracles, the priest or mage have to remain in the same location and are therefore limited to what they can see or the area effect of the spell or miracle they are attempting to cast. This can mean that some spells and miracles have to be cancelled to avoid blasting friends.As all this is happening, the enemy are bearing down on the party. Some may actually avoid the front characters and reach those towards the back of the party although the odds are that those at the front of the party will try to head them off. Sadly, in the confusion of the fight and due to the terrain as well as other factors, combat is rarely clean.
Terrain effects weapon speeds. For example jungles and swamps and other places where there is dense foliage get in the way of big weapons making them harder to wield effectively. This is accounted for by a decrease in speed. Dungeons tend to be ill-lit, uneven and cramped at the best of times. Short and thrusting weapons such as spears are most effective in these environments while the use of bows should be avoided. Cross-bows are the least hampered missile weapon although due to the lack of space to find a decent vantage point, even these are slower as the character has to wait for an opening
Other monsters form large packs. Hoards of goblins will surround each character slicing away with daggers and spears. This is a problem for spell users and archers. Against these, fast weapons that inflict small amounts of damage are excellent. Larger weapons may well do excess, wasted damage and you may find your characters are losing valuable time in recovery. As these monsters rarely do much damage light armour that does not hamper is also a bonus (except for dwarves).
Large monsters such as dragons have thick scaly hides against which small weapons are ineffectual. As these monsters can sometimes kill in a single strike, heavy armour is a must for all characters close to the front. Even those at the back may be in danger due to the sheer size of the creatures. Big weapons are also a must unless your characters have very magical weapons of a smaller calibre. Doing large amounts of damage in a single blow is the best way of defeating them. A character may well spend the entire combat bouncing sling stones of their hides without so much as scratching them.
MONSTERS
By now you will have encountered a number of monsters, some of which were easy to kill, others may well have been more difficult. As your party progresses, it will encounter more monsters and as your characters progress, you should find that ones that were a real challenge at first will become little more than troublesome pests. Here are some tips on how to deal with them.
Monsters have a great many aspects to them. How good are they at fighting and how much damage do they generally inflict are the most important. How fast they move and how quick they attack are two other areas that should be gauged. Finally what armour and unusual abilities do they have should be considered before charging into combat with them. There are two ways of going about this, one is to re-equip your party before setting out to attack a chosen monster, thus gearing up especially for the specific monsters. This however is time consuming and should be avoided if possible. Anything above a few orders and it may be better to go for option two. This is to specialise your party so that it is able to proficiently fight a certain range of monsters while avoiding others. Even if you chose the latter option, as your party becomes more experienced, you will find that the range of monsters that you can fight with your chosen equipment increases.
Typical monsters such as goblins, orcs and other humanoids appearing in small groups are best dealt with using missile weapons. The combat example in this rule book shows this clearly. The archers have time to cut the monster numbers down before melee begins. By this time your party may well have a distinct advantage. This is an excellent tactic when they do not outnumber you by many and each monster is not particularly powerful
Monsters such as centaurs are fast on the ground, they will charge your party trampling and kicking in all directions while your characters are still spanning cross-bows. Against fast and powerful creatures that only appear in small groups, it may be best to avoid using missile weapons unless your characters are really proficient in this area. Long reach weapons may be your best choice. Spears and other pole arms are recommended although one-handed weapon and a large shield are also a very wise choice.
Next....
QUESTS
Whenever you visit a town, there will be opportunities for your party to undertake a Quest. At first these will be very simple as they are intended to help you get used to the game mechanics but as you get more experienced they will become more complex.
Once you think you have completed your Quest, issue the YES order again. If you have successfully completed it, you will then be paid a reward of gold plus a number of experience points. If not, you will be told what remains to be done. You are allowed to have three Quests active at any one time.
YES, ACCEPT/COMPLETE QUEST
Y (quest)
For example: Y 1232 will have your party start or end quest number 1232.
ZAP QUEST
Z (quest)
For example: Z 1232 will cancel Quest number 1232.
HORSES
The wilderness is a big place and walking through it is a slow and time consuming process. Should you consider this though, the use of horses will be a valuable asset to any adventure. Horses can carry spare equipment, thus reducing loads and also increase the movement rate for the party. The amount that the animal can carry is dependant on the breed. Horses have different movement rates for the various types of terrain. Mules, for example are suited to hilly terrain.
Horses can either be bought from a settlement stable or captured in the wilds. The latter is obviously free although the horses are not tamed and have to be broken in. In order to capture horses all that is required is to make an attack against them using the standard engage order or have a hostile attitude to them. Instead of attacking, you will attempt to capture some while the rest scatter to adjacent regions. Repeated attempts to capture them will require track orders between attempts.
Once captured, as stated above the horses need to be broken in before being ridden. This can be done using either by buying the 'break in horse' from a shop offering the service or attempt to have your characters try it themselves. The latter is risky but can be achieved issuing the 'Use' order for character and the horse.
If you wish to exchange horses for cash, bring them to your local stables. As stables don't carry cash, you won't be given any, but instead a chit which can be exchanged at any Blacksmiths or Stables for replacement horses. You can also exchange chits for cash at any Bank. Just go to the Withdraw shop and hand the chit over.
MOUNTING & DISMOUNTING HORSES
Use the RM order to mount or dismount horses.
RM Character/99 Horse Number (701-703,708,709)
Horse Number is 701:Mules, 702:Arabians, 703:Draft, 708:Mount up, 709:Dismount
e.g. RM 1 701 Character 1 mounts a mule (if dismounted) or dismounts if already mounted.
e.g. RM 99 708 All characters mount up. This tries Arabians first, then Draft Horses and finally Mules
Each character has a number of statistics used to represent their skills and abilities. The meanings of most of these is fairly obvious but we have given a brief description below for each statistic.
| TYPE
The race and profession. |
Melee and Missile
Weapons used in combat. |
TO
Toughness |
Load
Encumbrance |
| Sex
Either male or female. |
AR
Armour class. |
AW
Awareness |
Energy
Tiredness |
| Gold
Amount carrying. |
SK
Skill in his chosen profession. |
EXP
Experience points |
Health
Physical well being |
There are four main classes of adventurer, these being fighter, mage, priest and thief. All are open to any type of race.
Fighter is the generic term for a character that has followed the realm of arms. This could be due to lack of training in other areas or a natural inclination to bash things.
The standard profession for fighters is the Warrior and as the name suggests, characters of this profession are skilled in combat and can usually handle all kinds of weapons and armour without difficulty. Toughness is an important attribute for a fighter but awareness is also useful, especially when using missile weapons. When in combat, a fighter's skill statistic is used with the skill he has with his weapon to give an overall fighting ability. Fighters have been trained since adolescence in the wearing of heavy armours. This allows them to use even cumbersome platemail with only minor penalties. Other classes have specialised in certain areas : The archer is better with a bow or cross-bow while not as good with a melee weapon. A gladiator is adept at bashing things with melee weapons but be restricted by heavy armours and have no real skill with missile weapons.
The character has a special gift that allows him or her to manipulate mystical forces. It is something that is accepted is not well understood by the peoples of Kharne. This sets mages apart from others and makes many wary of them and think twice before being rude. Maybe this is why it is common practice to wear robes, effectively announcing to all what they are.
The most common mage profession is the Wizard and like all characters of this class are skilled in the use of magic. They will begin knowing just a few simple spells but as the game progresses will learn many more. A mage's skill determines how many Power Points the mage has and the level of spells that he is able to cast. In general, mages are the weakest of all classes in combat, years of book learning instead of physical exercise means that they lumber around when wearing heavy armour and if possible avoid wearing anything other than cloth armour.
The warrior mage is an exception regarding the armour rule. This character has only been marginally touched by the gift, possibly from eating magical berries as a child or born on a special day. The lack of the full gift means that they have not been given the full training and as such will never achieve the highest powered spells but make up for this by being handy in a fight and not as restricted by armour.
Next.....
DWARVES
Short and stocky but immensely strong, dwarves are tough as old boots and always ready for a good fight. They are often still in the thick of things after the elves are little more than dust on the horizon. All dwarves, even females, proudly display long thick beards. Their short stature makes it difficult for them to use certain large weapons, such as great-swords and long bows. It is rumored that even before being able to walk they are able to wield a smithing hammer. It is true that they prefer the hammer in combat although a axe is also closely associated with dwarves even though they are not renowned for chopping would. With fingers like stone, it is hardly surprising that they can span a cross-bow with their bare hands. This remarkable display of fortitude shaves vital moments normally lost during reloading. This makes the crossbow their favoured missile weapon. Dwarves are said to have bones of stone. While not actually true their grey pallour and grim appearance likens them to the mountains they are found of mining. They stand between four and five feet in height and are nearly as broad. Their beards are black or brown although older dwarves may get gray patches. Legends have it that the oldest dwarven kings lived so long that the entire beards became white. With thick bristly eye-brows their eyes appear as little more than blackened pits with a occasional flicker of light from the depths, generally when talking about gold. Dwarves are nothing if not practical, preferring heavy cloaks and thick sturdy clothing with a wide belt. Ostentation comes in little more than finely wrought jewelry such as a necklace worn beneath their shirt or an elaborate ring. To be shown these is a rare gift of acceptance that they only bestow on a few.
HALFBLOODS
These are the mongrels of Kharne, usually the offspring of human and orc, or human and goblin matings. As they are normally outcasts from their respective communities, this will usually result in them having excellent awareness and reflexes but sometimes not being very bright. Living an early life by their wits and cunning and fearing that anything that cannot be concealed will be taken by bigger and stronger individuals has meant that many have only been able to train with daggers and slings and bare fists. This makes them the swiftest fighters although their preferred weapons rarely deliver much damage unless somehow enchanted. Like elves they have developed a rather keen interest in preserving their own hides and they will gladly abandon their adventuring allies should things look a little bleak.Halfbloods appear as malnourished and often hideously grotesque humans. It is rare, in fact unheard off for one to be without a number of scars. A halfblood with both ears is probably one not to mess with as these are usually bitten off when they are small. They take no pride in their appearance and will often avoid water bathing only when caught in a sudden down-pour. They laugh at others misfortunes as it is always a relief not to one the receiving end. As they have always had to fight to eat from an early age, many will gorge until they vomit while others have not been adverse to digging up a recently buried ally for a midnight snack, especially if they were in the prime of their life when they died. If asked if the reason for their behaviour is because of what they are or because of how they were brought up, most would not care either way
There are many races living on Kharne but only four are suitable for adventuring, these being, human, elf, dwarf and halfblood (the result of a human and probably orc mating). Other races are not generally allowed to enter towns and do not have the right combination of intelligence and skill to last long as adventurers.
While one race may not exactly love another, all races will work together in a party.
HUMANS
Humans make up most of the population of civilized Kharne and have the widest range of abilities. They are also the most adaptable of the adventuring races and although they have no great advantage in any field, neither do they have any special weaknesses. They have no natural weapon preferences but by the same token they do not have any aversions to specific weapons.
Humans stand around six feet in height and have generally brown or black hair although reds and blondes are not uncommon. Eye colour tends towards brown or blue while green are considered quite rare and are often associated with elven heritage. Human clothing tends to be based on whatever station the person has attained in life. Most city folk and nobles prefer fine spun silks with rich embroidery while peasants have little more than homespun wool shirts and pants with hide shoes.
ELVES
These tall graceful beings are by far the most intelligent of the adventuring races. Most of the world's greatest mages are elves. Their keen eyes and steady nerves make them very accurate with missile weapons but they are less hardy than other races and this can put them at a disadvantage in melee combat. Elves have a natural aptitude for the bow. Their fingers seem to nearly conjure the arrow from the quiver to the string. This talent for swift movement is also demonstrated with swords. Elves tend to be flighty characters. Maybe it has something to do with their acknowledged fairy heritage or their long life-span that instills a prominent desire for self preservation but even after a few scratches they tend to run for cover.
Most elves are around five feet in height although there are a few rare individuals that reach heights of nearly seven feet. These are said to be the oldest elves and do not stop to talk with others except in unusual times. Common hair colour is blonde, and is often worn long and loose by both genders. They prefer loose fitting garb that is often near invisible although this is reserved for only elven gatherings. Their eyes are invariably a vibrant green with flecks of gold although the cat like shape of the pupil immediately distinguishes them from human.
Next.....
PREPARED SPELLS
As spell casting in combat is automatic, your mage or priest can prepare up to six spells ready for casting. These can be all different or the same spell can be used two or more times. When a battle begins, the spell caster will look at the first spell and if this is suitable, will start to cast it. Once this has been cast, he will try to cast the next one down the list. If a spell is unsuitable, such as healing when nobody is injured, or missing ingredients or points are too low, the spell will be ignored.
Each spell or priest power takes time to prepare and cast. Generally, the more powerful the spell, the more time it takes to cast. If a mage or priest is hit during the casting of a spell or power, his concentration is interrupted and he moves on to missile or melee combat.
ORDER OF CASTING
0 (character) (position) (spell)
For example: 0 3 4 62 will have character three prepare to cast spell 62 as his fourth spell in the event of combat
TRACKING
Monsters are computer controlled and have a degree of intelligence. They do not sit about waiting to become a player's next meal but have their own agenda. If you see a monster on your map and wish to attack them the following turn, they may have moved a few sectors before you get there. In case this has happened, it is often a good idea to move to their last location and then issue a TRACK order followed by one or more ENGAGE orders.
TRACK
T (target)
For example: T 3849 tells your party to follow the trail of monster group 3849.
EXPANDING YOUR GROUP
A party can include up to fifteen different characters so one of the things you will wish to do early on is recruit a few new members. This is done while in town and is a two part process.
You first place an advert for potential adventurers to join your party. You will need to offer an amount of gold, with 50 being the minimum. The more you offer the better the potential recruits and the more that apply.
You can specify what type of character you are looking for but others may turn up as well. Use the number shown.
| Human Fighter (HF) - 1 | Dwarf Fighter (DF) - 9 |
| Human Mage (HM) - 2 | Dwarf Mage (DM) - 10 |
| Human Thief (HT) - 3 | Dwarf Thief (DT) - 11 |
| Human Priest (HP) - 4 | Dwarf Priest (DP) - 12 |
| Elven Fighter (EF) - 5 | Halfblood Fighter (BF) - 13 |
| Elven Mage (EM) - 6 | Halfblood Mage (BM) - 14 |
| Elven Thief (ET) - 7 | Halfblood Thief (BT) - 15 |
| Elven Priest (EP) - 8 | Halfblood Priest (BP) - 16 |
JOIN ME
J (character type) (gold)
For example: J 11 70 will offer 70 gold for a dwarf thief.
On your next game report, you will see who turns up and can then accept any, all or none of the applicants. You must use the number to the left of the recruit to indicate the ones you accept. They will then be paid the gold you offered and immediately join your party. You should give the recruit(s) a name.
The recruit will take the lowest empty character slot i.e. become character seven if he is your first additional member. This is important if you wish to buy equipment for him immediately as you must use the character number not the recruit number
Next...
When you meet a party belonging to another player, as long as he has not selected the private option, you will be told that player's name and postal and/or email address, and he will receive yours. This allows you to contact another player directly and exchange information, make joint plans, negotiate deals and more.
Please remember that Quest is played by people of all ages for pleasure and amusement. It is against the rules, and the spirit of the game, to use obscene language or to insult other players in your correspondence. It is also against the rules for players to use the names and addresses they receive through Quest for anything other than exchanging Quest related material. In the interests of all players, any player found abusing either of these rules will be removed from the game
Using a party profile form, you can enter a short description of your party, a shield design and a battle cry. When you meet other parties they will be given your description and you will be given theirs.
You can use these to give away small bits of information or add bogus messages. Rumours are listed in the town newspapers. Rumours are only accepted on official rumour forms (the website is still being written). A fresh one is supplied every ten turns.
Each game of Quest has its own player produced newsletter, which is published and distributed free of charge, usually every three or four game weeks. It carries articles, messages, offers of alliance, etc. If you would like to send a contribution to your game newsletter, you can either send it directly to the editor or via KJC.
If you have already sent us your party name and those of your initial six characters, your first turn report should be with you shortly. If not, or if you wish to start another bunch of characters off, you need to send us the information listed in the back of the rulebook.
There are several features built into Quest that will help you, as a new player, get established and quickly learn about the game. Your party is currently registered as a 'No Attack' party that stops more experienced players from attacking you. So it is fair, you can not attack them either but if it is fighting you want, there are plenty of monsters to bash. And, if you are unfortunate enough to have a character killed, during the first twenty turns Temples of Baldor, found in most cities and some towns, will resurrect dead characters for free
The game is operated by KJC using several powerful computers and a massive set of computer programs and a database many megabytes in size. You should consider these the board or world in which your party adventures. You do not need a computer yourself to play Quest, but if you have one you may like to use it to keep track of the masses of information you will acquire during the game.
Players in Quest control their party using a number of instructions or orders. These are entered onto a Turncard which is sent to KJC. A Turncard has space for fifteen different orders. Every time you submit a Turncard, you will be charged a fee but your first three Turncards for a new party are free.
The orders from your Turncard tell the computer programs what you would like your characters to do. Once they have been processed, a report is generated which shows what happened during your turn and anything else that may have occurred. This report is then sent to you.
You continue submitting Turncards for your party for as long as you wish to remain an active member of Quest. During your first twenty turns, as you are getting used to the game system and building your party, there are no limits on how fast you can have your Turncards processed.
However, different Quest worlds run at different speeds or as we call them, 'game weeks'. Once you have reached turn 21, to keep a game fair, you will normally only be allowed to have one Turncard processed each game week. Game Weeks are every 3-4 days, weekly, every ten days or fourteen days. The length of your Game Week is shown on the top right hand side of your turn report. If you would prefer a different Game Week, please let us know now so we can enter you into a suitable world as we can not move your party later.
Quest will normally run very smoothly but very occasionally a Turncard may go missing or your results go astray. If you don't receive your turn when you expect it or have a problem sending a new one in, get in touch so we can sort it out. As long as your last turn was processed within a couple of months, we should be able to send you a duplicate.
INVESTIGATION
Virtually everything in Quest can be investigated and an information token will be provided which tells you about what it is and what it can do. This includes all items, monsters, shops and shop services, in fact almost anything with a number. You can not use names.
If you use a target of zero, your party will investigate its current location and try to find anything useful or hidden close by. Using a target of 99 will have you investigate your own characters and discover their weapon skills.
INVESTIGATE
I (target)
For example: I 801 will investigate monster type 801.
While in the wilderness, you can order your fit characters to investigate your current location while injured or tired characters take a rest. This does however use up Movement Points at the rate of two per hour. The maximum length of time you are allowed to rest is four hours.
EQUIPING AND USING ITEMS
Your characters will automatically equip with the best armour they have available and with the first melee and missile weapon they are given. If later you wish them to use a different weapon you will need to issue a USE order. The USE order can also instruct your characters to use various items that they collect or use an item on another character or monster.
USE ITEM
U (character) (item) (target)
For example: U 2 114 0 equips character 2 with 114 (a heavy crossbow).
GAME MAPS
Each turn you will receive a map showing the details of your current location. To find where you are in the world, you will have to use the information found on the appropriate website with the world map. A little detective work using the names of the nearest cities and the bodies of water will quickly identify where your party is.
When you are travelling through the wilderness, the local map will show the terrain of each sector that you passed through and what was visible from the route you travelled. A number ABOVE (HTML) or UNDERNEATH(TEXT) a map sector represents something interesting in a particular square. The key below the map tells you what this was; it could be another player's party, a monster or perhaps a town. There could also be monsters on the map that you can not see.
This is the format or style that you need to send your orders so that they can be read by our computer programs. They are fairly straight forward, normally consisting of a letter followed by a few sets of numbers.
On the following pages, aspects of the game are described in detail, followed by the order format and an example of each.
Similar things in Quest have similar number ranges. You don't need to bother too much with these now; it will be become much clearer as you play the game.
| 0 = Your parties current location | CHARACTER TYPES |
|
| 1-15 = Characters of your party | Human Fighter (HF) - 1 | Dwarf Fighter (DF) - 9 |
| 20-89 = shops and dungeon rooms | Human Mage (HM) - 2 | Dwarf Mage (DM) - 10 |
| 95 = All your fighters | Human Thief (HT) - 3 | Dwarf Thief (DT) - 11 |
| 96 = All your thieves | Human Priest (HP) - 4 | Dwarf Priest (DP) - 12 |
| 97 = All your priests | Elven Fighter (EF) - 5 | Halfblood Fighter (BF) - 13 |
| 98 = All your mages | Elven Mage (EM) - 6 | Halfblood Mage (BM) - 14 |
| 99 = Your party | Elven Thief (ET) - 7 | Halfblood Thief (BT) - 15 |
| 101-750 = Types of Items | Elven Priest (EP) - 8 | Halfblood Priest (BP) - 16 |
| 801-1000 = Types of Monsters | ||
| 1001-2000 = Party or player numbers | ||
| 2001-9999 = Computer run Monsters/characters | ||
| 10,000+ = Individual Item numbers | ||
As you can see from the above, some things, such as monsters and items, have both a type and an individual item number. This is because there is a general number that covers all things in that category, e.g. Orcs are monster type 818 but an individual Orc group will have a unique monster number, i.e. 3451.
Home